Why Top-Loading Washers Create a Unique Storage Challenge
If you have a top-loading washer and dryer, you already know the frustration: that open lid means you can't place anything on top of the washer, and you lose what would otherwise be the most convenient shelf in the room. Unlike front-loading machines where a folding surface sits right on top, top-loaders force you to rethink your entire storage layout from scratch.
The good news? With the right approach, a top-load laundry room can be more organized than any other setup. This guide covers exactly what to do, what to buy, and how to arrange it all without wasting a single square foot.
Step 1: Map Out Your Usable Space First
Before you buy anything, stand in your laundry room and take stock of what you actually have. Most top-load laundry rooms offer:
- The walls -- your biggest underused asset in any small room
- The space above the dryer -- the dryer lid stays closed, so this wall section is available for a mounted shelf
- Floor space beside the machines -- especially valuable if you have even 12 inches of clearance on either side
- The back of the door -- if your laundry room has a door that swings inward, this is prime storage real estate
Write down the measurements of each space before you start shopping. Even an inch matters in a tight laundry room, and nothing is more frustrating than assembling a shelving unit only to find it is two inches too wide.
Step 2: Add a Freestanding Shelf Beside the Machines
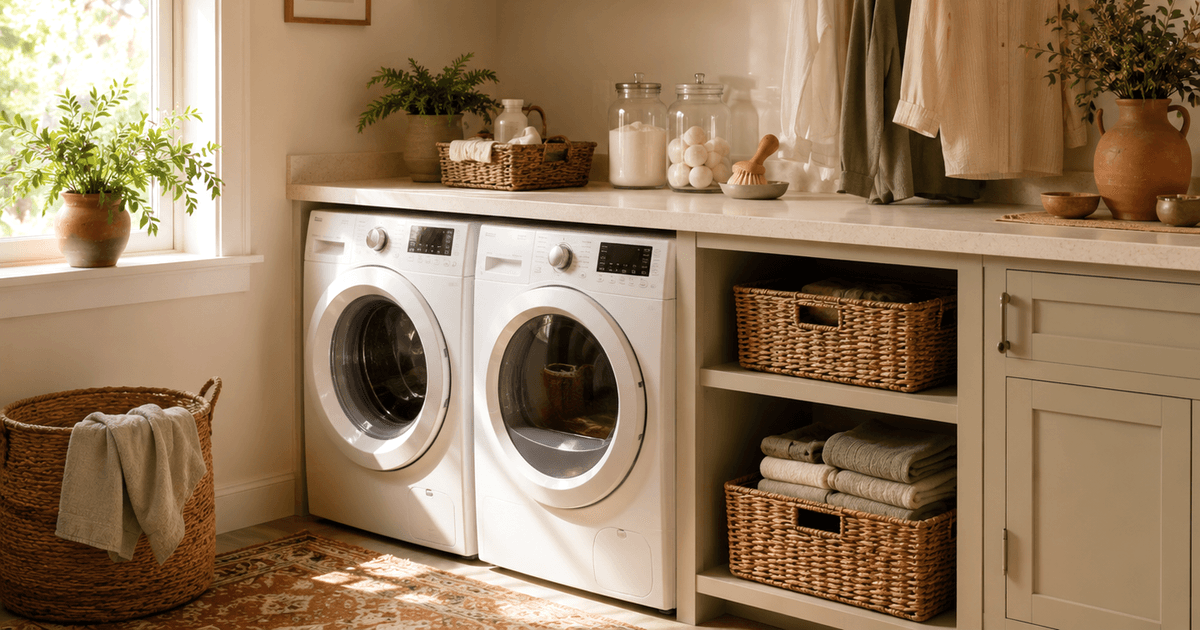
The single most impactful upgrade in a top-load laundry room is a freestanding shelving unit placed beside your machines -- not on top of them. This unit becomes your detergent station, supply hub, and staging area for clean laundry all at once.
The Compare Options is an ideal fit here. It is adjustable, holds up to 250 lbs per shelf, and the open wire design allows air to circulate so damp items do not grow mildew. At roughly 36 inches wide and 14 inches deep, it fits in the narrow gap most laundry rooms have beside the machines without jutting into the walkway.
Organize the shelves like this:
- Top shelf: Detergent, fabric softener, and dryer sheets -- everything you reach for every single load
- Middle shelf: Stain treatment sprays, mesh laundry bags, and specialty detergents for delicates
- Bottom shelf: A laundry basket or bin for items waiting to be folded and put away
Step 3: Install a Wall-Mounted Shelf Above the Dryer
Your dryer lid is always closed, which means the wall directly above it is available for a mounted shelf. A single floating shelf installed 12 to 18 inches above the dryer creates valuable storage without consuming any floor space at all.
Reserve this shelf for items you do not need every load: bulk detergent pods, spare dryer balls, cleaning supplies for the machines themselves, and laundry-adjacent items like sewing kits or static spray. Keep it to one layer deep so you are never reaching over one item to grab another.
Step 4: Set Up a Sorter That Eliminates Pre-Wash Digging
One of the biggest time-wasters in any laundry room is digging through a single hamper to separate lights from darks before every wash. A dedicated sorting system eliminates this step entirely -- you sort at the hamper when clothes go in, not at the machine when you are ready to wash.
The Compare Options handles this well. It combines a rolling hamper section with upper shelving, so you get sorting and supply storage in a single footprint. The rolling base is particularly useful in tight laundry rooms -- you can wheel it out of the way while the machines are running, then roll it back when you are ready to fold.
If floor space is extremely limited, a 3-bag hanging sorter that mounts over the back of the door accomplishes the same sorting goal with zero floor impact.
Step 5: Contain Everything in Matching Bins
Open shelves collect dust and look disorganized within days unless every item has a designated container. Uniform bins are the simplest fix -- they make even a purely functional laundry room look intentional and calm, and they make it much easier to find what you need at a glance.
The Compare Options works well on wire shelving because the handle cutout makes it easy to pull off the shelf with one hand, and the narrow profile fits on a 14-inch-deep shelf without overhang. Use one bin for cleaning cloths and machine wipes, one for miscellaneous supplies, and one as a catch-all for items that drift into the laundry room from elsewhere in the house.
The Labeling Step Most People Skip
Once your bins are placed, label them. Even a marker on masking tape is sufficient. The goal is that anyone in your household can find what they need and put it back in the right spot without asking you first. This one habit is what separates laundry rooms that stay organized from ones that revert to chaos within two weeks.
Step 6: Solve the Liquid Detergent Drip Problem
Liquid detergent jugs are tall, heavy, and prone to dripping -- they are responsible for the sticky residue that builds up on laundry room shelves faster than anything else. A few targeted fixes make a real difference:
- Put a drip tray under every liquid jug. A small silicone tray catches drips before they reach the shelf surface.
- Store the bulk jug on the floor, decant to a smaller pour container. This reduces shelf weight and makes measuring easier without lifting a gallon jug every wash.
- Switch to pods. Pods eliminate drips entirely and store compactly in any covered bin, which also keeps humidity from clumping them together.
The Compare Options is excellent for pods. The airtight seal keeps moisture out -- important in the consistently humid environment of a working laundry room -- and the clear walls let you see at a glance when you are running low.
Step 7: Create a Dedicated Folding Zone
The most common complaint about top-loading washers is the lack of a flat folding surface. The dryer lid stays closed during the cycle, but that top surface is only about 24 inches wide -- workable for folding a small load, but cramped for anything larger. Your options depend on how much floor space you can spare:
- Dryer top only (no extra space required): Fold directly off the dryer as each load finishes. Keep the dryer top completely clear of everything except the current load being folded. This requires discipline but costs nothing.
- Wall-mounted fold-down board: A fold-down board mounts to the wall and folds flat when not in use. It provides a full-width folding surface in under two seconds and disappears completely between uses.
- Small utility table beside the machines: If you have 18 or more inches of floor clearance beside the machines, a compact table provides a permanent folding and staging surface that doubles as extra counter space.
Step 8: Add a Collapsible Bin for In-Progress Items
Every household laundry room accumulates items in a kind of organizational limbo: the sweater that needs to air-dry, the dress shirt waiting for the dry cleaner, the socks that have lost their partner. Without a designated holding spot, these items colonize every flat surface in the room.
The Compare Options handles this perfectly. It collapses completely flat when empty -- taking up essentially no space during weeks when laundry is running smoothly -- but expands to hold a full family's worth of in-progress items when things pile up. The reinforced handles make it easy to carry between rooms when you need to sort or distribute laundry.
A Five-Minute Weekly Reset to Keep It Working
No storage system stays organized on its own. A quick weekly reset prevents small messes from compounding into the kind of disorder that requires a full afternoon to fix:
- Return any items that do not belong in the laundry room to their home in another room
- Wipe down the top of both machines and the shelf surfaces
- Check supply levels and add anything running low to the shopping list
- Empty and refold any reusable laundry bags or collapsible bins that are sitting empty
Done consistently, this five minutes prevents the two-hour overhaul that happens when laundry rooms are allowed to accumulate disorder over months.
Putting It All Together
Organizing a laundry room with a top-loading washer and dryer is fundamentally about compensating for the one thing you do not get: a built-in work surface on top of the washer. A freestanding shelf beside the washer, a wall shelf above the dryer, a structured sorting system, and uniform bins for all supplies solve about 90 percent of the typical laundry room chaos. Start with whichever of those four changes makes the biggest difference in your specific space, then build from there as your budget and time allow. The result is a room that runs more smoothly with significantly less effort on wash day.
FAQ
How do I add storage to a laundry room with a top-loading washer and dryer?
Because the top of the washer must stay clear for loading, storage needs to go above the dryer or on the surrounding walls. A wall-mounted shelf above the dryer handles detergent and supplies, while a freestanding shelving unit beside the machines handles larger items like sorted laundry bags, extra linens, and cleaning products. Over-door organizers on the laundry room door add a third storage layer without taking any floor space.
What is the best place to store detergent when you have a top-loading machine?
A wall shelf positioned directly above the dryer -- or on the wall beside the machines at arm's reach -- is the most practical detergent location. It keeps bottles off the floor, off the dryer top, and within easy reach when you're loading. If your laundry room has limited wall space, a slim rolling cart beside the dryer with the top dedicated to laundry supplies works just as well.
Can I put shelves above a top-loading washer?
Yes, but leave at least 18 to 20 inches of clearance between the top of the washer and the bottom of any shelf so the lid opens fully and you can reach the bottom of the drum without hitting a shelf. Wall-mounted floating shelves or a freestanding unit with an open side toward the machine both work. Measure your specific washer's open lid height before installing anything.