We research, compare, and evaluate every product we recommend, and only describe a pick as directly tested when that is specifically documented. As an Amazon Associate I earn from qualifying purchases. When you buy through our links we may earn a commission -- at no extra cost to you. Prices and availability verified May 19, 2026. Full disclosure.
Wire shelves are the default in most rental apartments, older homes, and builder-grade pantries. They're durable and easy to install -- but they create a unique set of problems. Small items fall through the gaps. Bottles and cans tip sideways. Nothing lines up neatly. And every time you grab something from the back, three other things tumble forward.
The good news: a wire shelf pantry is completely fixable without any drilling, major renovation, or a weekend-long project. You need the right bins, a smart layout, and one afternoon. Here's the exact system that works.
Why Wire Shelves Are Harder to Organize Than They Look
Wire shelving is durable, airflow-friendly, and easy to clean -- but it was never designed with small pantry items in mind. The gaps between wires (usually ½ to 1 inch apart) let small packets, spice jars, and produce bags slide right through. The open design also means nothing has a designated zone, so everything migrates toward the front and creates a cluttered pile even when the pantry is technically stocked correctly.
The solution isn't to rip out the shelving. It's to layer bins and baskets on top of the wire surface, creating a flat, stable foundation for every category of food you store. Think of the bins as the actual organizing system, and the wire shelves as the structural support beneath them.
Step 1: Measure Before You Buy Anything
The fastest way to waste money on pantry organizers is to skip measuring. Before purchasing a single bin, grab a tape measure and note:
- Shelf depth -- standard pantry shelves run 12-16 inches deep
- Shelf width -- usually 24-36 inches, sometimes wider in walk-in pantries
- Height between shelves -- this determines what bins and containers will physically fit
Write these measurements down before you shop. A bin that's exactly 12 inches wide on a 12-inch-deep shelf leaves no clearance to slide it in and out easily. A good working rule: leave 1-2 inches of clearance on all sides so you can lift, slide, and replace each bin without knocking everything over.
Step 2: Use Clear Bins to Create a Flat Surface
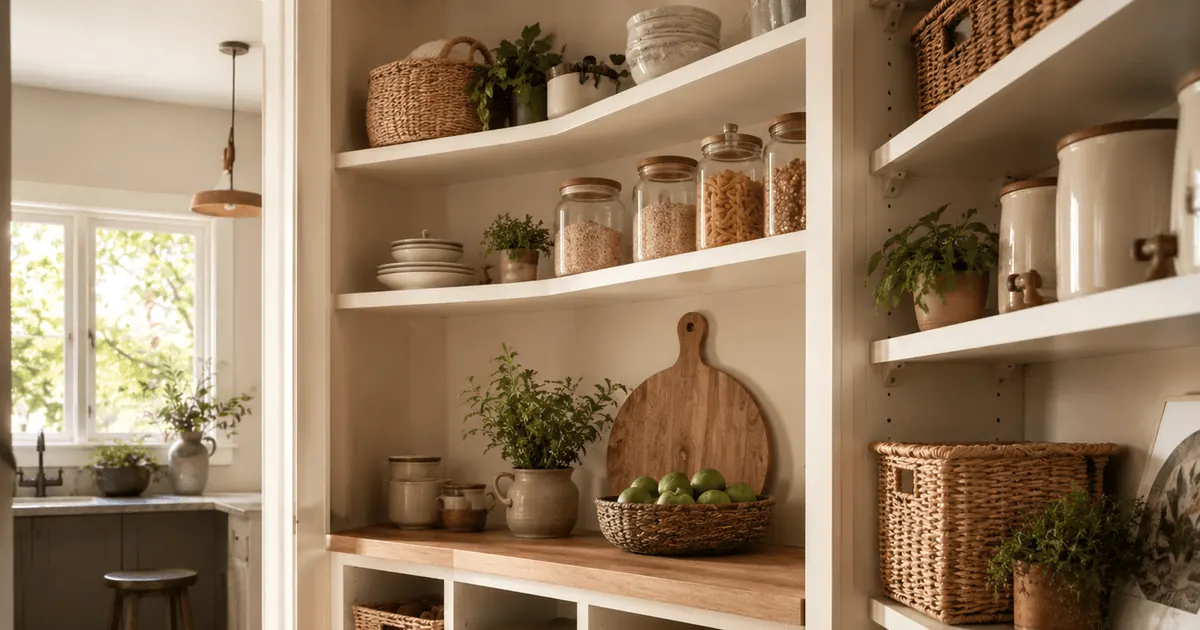
The single most effective upgrade for wire shelf pantries is placing clear plastic bins directly on the wire. This does two things: it eliminates the gaps that swallow small items, and it creates a visual boundary between categories so everything has a home.
Clear pantry bins are a top pick for this purpose. They're low-profile, come in several widths, and the clear sides let you see exactly what's inside without pulling anything out. Use one bin per category: snacks, baking supplies, pasta and grains, breakfast items, and so on.
For deeper shelves (14 inches or more), use two bins front-to-back in the same zone. The front bin holds what you reach for daily; the back bin holds overflow and backstock. This eliminates the buried-in-the-back problem entirely.
Even with bins in place, some items -- especially bottles and jars -- benefit from a liner that grips the wire and prevents any movement. A non-slip shelf liner cut to size takes about two minutes to install and keeps bins from sliding when you grab something quickly.
Look for a liner that's thin enough not to add height (thicker liners can push bins into the next shelf above) and waterproof so spills wipe clean. Many home organization brands sell these in rolls you cut to fit. Place the liner under the bins, not inside them -- you want the bins themselves to stay put, not just their contents.
Step 4: Add Pull-Out Baskets for Deep Shelves
If your pantry is deeper than 14 inches, pull-out baskets are the biggest quality-of-life upgrade you can make. Instead of reaching past three rows of cans to grab the one in the back, you pull the entire basket toward you and see everything at once.
A pull-out pantry basket is designed specifically for this. It sits on top of existing shelves -- including wire -- rolls smoothly on a track, and is sturdy enough to hold a full row of heavy canned goods. Use one per shelf tier for your heaviest categories: oils, vinegars, sauces, and canned food.
Step 5: Zone Your Shelves by Frequency of Use
Once your bins and baskets are in place, assign zones based on how often you use each category. This is what separates a pantry that looks organized from one that actually functions well day to day.
- Top shelf: Rarely used items -- bulk buys, large appliances, overflow stock, entertaining supplies
- Upper-middle shelf: Breakfast items, snacks, cereal, bars
- Eye-level shelf: Daily staples -- cooking oils, pasta, rice, canned goods
- Lower-middle shelf: Baking supplies, spices, condiments, vinegars
- Bottom shelf: Heavy items (large bags of flour or rice), root vegetables, pet food
Within each zone, one bin equals one subcategory. Don't mix snacks with breakfast items just because they're the same size -- each category needs its own defined space or the system falls apart within a week.
Step 6: Use Stackable Open-Front Bins for Canned Goods
Cans are a wire shelf nightmare. They roll, they stack awkwardly, and you can never see what's hiding behind the front row. Stackable open-front bins solve this problem precisely.
Stackable can organizers tilt slightly forward so you can see and grab the front can, and additional cans roll down from behind as you remove them. Stack two or three high to take advantage of vertical space. These work especially well for soups, beans, tomatoes, and other pantry staples you cycle through regularly.
Step 7: Contain Small Packets and Loose Items
Seasoning packets, sauce mixes, ramen flavor packs, and small spice bags are the items most likely to fall through wire shelving or disappear behind larger things. The fix is a dedicated small-item container with solid walls all around.
For dry goods you store in their original packaging, a simple divided bin works well -- group Italian seasoning packets together, Asian sauces together, gravy mixes together. For bulk dry goods like flour, sugar, oats, and rice, decanting into airtight containers is a better long-term solution.
Airtight containers are a reliable choice for decanted staples. They stack cleanly, seal tightly to keep food fresh, and are easy to label. Decanting also makes it immediately obvious when you're running low -- no more discovering an almost-empty bag of flour mid-recipe.
For bread, chips, and anything sold in a bag, use an upright wire basket with solid sides. A basket with solid sides keeps bags standing upright rather than slumping sideways, and the open-front design makes it easy to grab what you need without disturbing the rest.
Step 8: Label Every Bin
Labels turn a functional pantry into a pantry everyone in the household can maintain. When every bin has a clear label, family members know exactly where items belong -- and more importantly, where to put things back after unpacking groceries.
You don't need a label maker. Adhesive chalkboard labels and a chalk pen cost under $10 and look clean on any bin style. For clear bins, a strip of painter's tape and a permanent marker is an equally effective zero-cost option.
Label categories broadly: SNACKS, BAKING, PASTA & GRAINS, CANNED GOODS, BREAKFAST. Avoid over-segmenting -- if a category has fewer than five items, it probably doesn't need its own dedicated bin. Combine small categories before they each get their own label and bin that's mostly empty.
Keeping the System Working Long-Term
The biggest threat to any pantry organization system isn't a busy week -- it's grocery runs where items get placed randomly because the habit of restocking into the right bin hasn't been established yet. For the first few weeks, make a point of putting every new grocery item directly into its designated bin. After about a month, it becomes automatic.
Once a month, take five minutes to do a quick reset: move any items that have drifted into the wrong zone, check the back rows of bins for items near expiration, and wipe down any spills on the shelf liner. That's the full maintenance routine for a wire shelf pantry that runs this system.
Wire shelves aren't the ideal pantry setup -- but with the right bins doing the structural work, they perform just as well as solid shelving. The key is treating the bins as the organizing layer and the wire as the support structure beneath it.
Quick Product Recap
- Clear pantry bins -- best for creating flat, stable zones on wire shelves
- Pull-out pantry baskets -- essential for deep shelves, keeps back rows accessible
- Stackable can organizers -- best for canned goods and jars
- Airtight dry goods containers -- best for decanted dry goods
- Upright wire baskets -- best for bags, bread, and chips
FAQ
How do I make wire pantry shelves work better with bins and baskets?
Add a shelf liner or mat to each wire shelf first -- this creates a flat, stable surface so bins sit evenly and small items do not fall through the gaps. Then use bins to create contained zones for each food category, and choose bins with handles or open fronts so you can pull the entire bin out to access items at the back without reaching past everything in front.
What size bins fit on standard wire pantry shelves?
Standard wire pantry shelves are typically 12 inches deep and available in widths from 24 to 48 inches. Bins that are 11 inches deep fit cleanly on a 12-inch shelf without overhanging. For width, 6-inch and 9-inch bins give you flexibility to line up two or three per shelf, while a single 16-inch bin works well for bulkier categories like snack bags or bread loaves.
Is it worth replacing wire shelves or should I just add liners?
Adding liners is almost always the right first move -- it costs under $20, takes 10 minutes, and resolves the two main complaints about wire shelves: items tipping and small things falling through. Replacement makes sense only if the shelves are damaged, poorly positioned for your storage needs, or if you are planning a full pantry renovation anyway. A lined wire shelf with good bins performs comparably to solid shelving at a fraction of the cost.