A walk-in pantry sounds like a dream -- until three months of groceries get shoved in without a system. Bags pile up on the floor, cans roll to the back of shelves, and you end up buying duplicates because you can't see what you already own.
The good news: a walk-in pantry is far easier to organize than a cramped cabinet. You have room to create real zones, add freestanding storage, and build a layout that makes daily cooking actually faster. Here are seven systems that will turn your walk-in pantry from a chaotic storage closet into a fully functional part of your kitchen.
1. Empty Everything Out First -- No Shortcuts
Before buying a single bin, pull everything out of the pantry and spread it on your kitchen counter or floor. This is the step most people skip, and it's the reason most pantry overhauls fail within six weeks.
Once everything is out, do three things:
- Check expiration dates and toss anything past its prime
- Group similar items together so you can see exactly what you have
- Note any gaps -- things you thought you had but don't
This inventory step usually takes 30 to 45 minutes, but it shapes every decision you make after it. You'll know how many canned goods you actually own, whether you need a designated snack zone, and how much space baking supplies actually require. Most people are surprised to discover they have three open bags of the same pasta or six cans of chickpeas. Knowing that upfront prevents you from buying storage you don't need -- and from organizing clutter you should have tossed.
2. Plan Your Zones Before Moving Anything Back
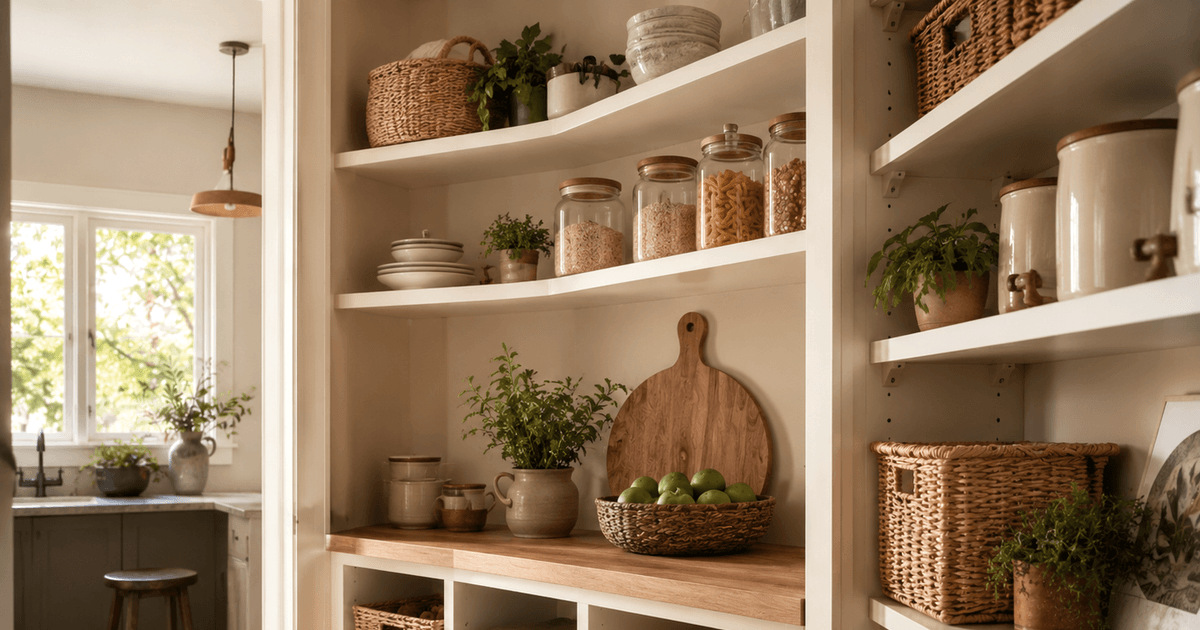
A walk-in pantry has enough room to divide into dedicated areas, which is what makes it so much more functional than a kitchen cabinet. The zone system is simple: every category of food has a fixed home, and it always goes back to that home. Common zones include:
- Daily use items - cereal, coffee, bread, snacks (at eye level or just below)
- Baking supplies - flour, sugar, oils, baking powder, extracts (together on one shelf)
- Canned goods and jars - grouped by type (soups, beans, tomatoes, condiments)
- Dry goods - pasta, rice, grains, dried beans
- Bulk and overflow - paper towels, large bags of chips, cases of water (bottom shelf or floor)
- Kids' snacks - if applicable, place at child height so they can grab independently
Draw a rough map of your pantry wall layout before you move anything back in. Assign each zone to a specific shelf or section. This single step prevents the most common pantry problem: everything drifting back into random spots within a week because there was never a clearly defined home for each category.
3. Switch Dry Goods to Airtight Containers
Nothing makes a pantry function better -- or look cleaner -- than decanting dry goods into uniform, airtight containers. Pasta, rice, flour, oats, cereal, and dried beans all stay fresher longer, stack cleanly, and let you see exactly how much you have at a glance without pulling anything off the shelf.
The Check Price is a reliable starting point. The containers are completely clear, airtight with a four-latch lid system, BPA-free, and stackable. They come in multiple sizes that work together efficiently on a shelf, and labels stick cleanly to the smooth sides. They're also dishwasher-safe, which matters when you're refilling flour every few weeks.
If you're outfitting a larger walk-in pantry and want to buy in quantity, the Check Price offer excellent value. The snap-lock lids create a reliable seal, and the rectangular shapes use shelf space more efficiently than round canisters -- no wasted corner gaps between containers.
Label every container with its contents and the expiration date of the oldest batch you poured in. A strip of painter's tape and a permanent marker works perfectly until you decide whether a label maker is worth it for your setup.
4. Corral Loose Items with Open Bins and Baskets
For items that don't go in containers -- snack bags, seasoning packets, granola bars, hot sauce bottles, instant oatmeal packets -- open bins are your best friend. Instead of items tumbling around a shelf, each category gets a dedicated bin you can pull out like a drawer.
The Check Price is well suited for pantry shelves. The open front makes it easy to grab items quickly, the handles make it easy to pull the whole bin off the shelf when you need to reach the back, and the clear sides let you see contents without moving anything. They stack cleanly when empty, which means buying extras to adjust your system later costs almost nothing in storage space.
One bin per category works best: one for chips and crackers, one for sauce packets and seasoning envelopes, one for kids' snacks, one for coffee and tea supplies. The category system is what makes it maintainable long-term -- anyone in the household can put things back correctly without having to think about it.
5. Add Wire Baskets for Produce and Bulky Items
Onions, potatoes, garlic, and shallots don't belong in sealed plastic -- they need airflow to prevent premature sprouting and rot. Wire baskets give them a dedicated home that keeps them off your counter while letting them breathe.
The Check Price stack in a tiered configuration that takes advantage of vertical space on a shelf without requiring a shelf riser. Each tier holds a different produce category -- onions on one level, potatoes on another, garlic in a small bowl inside the top basket. The open wire design prevents the moisture buildup that causes premature spoilage, and the stacked layout keeps all three accessible without moving anything out of the way.
These also work well for holding bulky packaged items like bags of chips, tortilla packages, and bread loaves that don't sit neatly in rectangular bins.
6. Solve Deep Shelves with Turntables or Two-Row Risers
If your walk-in pantry has shelves deeper than 14 inches, things will constantly get lost at the back. The items in front hide the items behind them, and you end up re-buying things you already have buried in the second row. There are two reliable fixes.
Lazy Susans for canned goods and jars: A turntable on a canned goods shelf lets you rotate the back row into easy reach without moving the front row. Load one per shelf in your canned goods zone so that a single rotation reveals every can. This works especially well for a shelf that holds a mix of soup cans, canned tomatoes, beans, and broth boxes.
Two-row riser systems for bottles and condiments: For sauces, oils, vinegars, and condiment jars, place a low shelf riser at the back of the shelf and stand items on it. The elevated back row becomes visible above the front row, so you can see and reach everything without pulling items forward. The Check Price work well in this configuration for grouping smaller bottles and packets that would otherwise tip over or get buried.
7. Label Every Zone and Every Container
Labels are the difference between a pantry that stays organized and one that falls apart by month two. They remove the need to make a decision about where something goes, which means everyone in the household -- kids included -- can maintain the system without being reminded.
What to Label
- Each shelf section or zone with its category name ("Baking Supplies," "Canned Goods," "Snacks")
- Every airtight container with the item and refill size (e.g., "All-Purpose Flour - 5 lb bag")
- Each bin with its contents category ("Seasoning Packets," "Coffee and Tea," "Kids Snacks")
You don't need a label maker, though they do produce cleaner results. Chalk labels with a white paint marker, printed labels in clear sleeves, or even a simple strip of masking tape with a marker all work. The medium doesn't matter -- consistency does. Pick one approach and apply it to every container and bin in the pantry so the system looks intentional and is easy to read at a glance.
Keeping It Organized Long-Term
The setup is the easy part. Maintaining it is where most pantry systems break down. A few habits that make a real difference:
- One-in, one-out for containers: Don't pour a new bag of flour into a container that's still half full. Use the old batch first, or stand the new bag behind the existing container with the date written on it.
- Weekly 5-minute reset: Once a week, scan for anything that has drifted out of its zone and put it back. This prevents the slow migration that leads to full reorganization every few months.
- Grocery unpack routine: When you get home from the store, sort new items into their zones before anything hits a shelf randomly. This takes an extra two minutes and prevents the pile-up that typically starts on the nearest open surface.
- Quarterly expiration check: Set a reminder every three months to pull forward anything approaching its date and move it to the front of its zone or a designated use-first section.
A well-organized walk-in pantry doesn't require expensive custom shelving or a complete renovation. The seven systems above work with whatever shelves you already have and a modest investment in containers and bins. The key is committing to the zone plan before you put anything back in -- and maintaining it consistently enough that it becomes automatic for everyone who uses the space.
FAQ
How do I organize a walk-in pantry from scratch?
Start by pulling everything out and sorting into categories: baking, canned goods, snacks, grains, oils and condiments, and so on. Before putting anything back, assign each category a dedicated zone on specific shelves, placing frequently used items at eye level and bulk or rarely used items on higher or lower shelves. Once the zones are set, containerize what you can and label everything so the system is obvious to anyone restocking the pantry.
What is the best shelving for a walk-in pantry?
Adjustable wire or solid shelving that can be repositioned as your storage needs change is the most practical choice for most walk-in pantries. Solid shelf surfaces are preferable to wire if you store small jars, spice bottles, or anything that tips through the gaps. If your pantry has existing fixed shelves, add risers, turntables, and stackable bins to maximize what you already have before investing in a full shelving replacement.
How do I keep a walk-in pantry organized long-term?
A weekly five-minute reset -- scanning for items out of zone and returning them -- prevents the slow drift that leads to full reorganization every few months. When restocking from a grocery run, sort new items into their zones before anything hits a shelf randomly. A quarterly expiration check pulls aging items forward and prevents the back-of-shelf graveyard that tends to accumulate in larger pantries.